Pages

Saturday, December 3, 2011

Country Pumpkin Muffins

I got this recipe for pumpkin muffins from www.allrecipes.com.  Here is the link for the actual recipe in all of it's originality:  http://allrecipes.com/recipe/country-pumpkin-muffins/detail.aspx.  Now...of course you know by now, that I've made my own personal adjustments to the recipe, like all other recipes I've posted here.

Before I share the ingredients, I will say that the original recipe calls for 1 1/2 cups raisins and 1 cup chopped walnuts.  I didn't put them in ours this time, partially, because I don't have them readily available in my kitchen and, partially,  because my husband and I don't regularly eat raisins and nuts in our breads.

Ingredients:
  • 2 cups sugar
  • 1/2 cup vegetable oil
  • 3 eggs
  • 1 1/2 cups canned pumpkin
  • 1/2 cup water
  • 1 1/2 cup buckwheat flour (Arrowhead Mills brand)
  • 1 1/2 cup Pamela's Products Gluten-Free Bread Mix & Flour Blend
  • 1 1/2 teaspoons baking powder
  • 1 teaspoon baking soda
  • 1/2 teaspoon ground cloves
  • 3/4 teaspoon ground cinnamon
  • 1/2 teaspoon ground nutmeg
Directions:
  1. In a large mixing bowl, beat sugar, oil, eggs, pumpkin and water.
  2. Combine flour, baking powder, soda, spices and salt.
  3. Add to pumpkin mixture; blend well.
  4. Fold in raisins and walnuts. 
  5. Spoon into greased muffin tins, filling 3/4 full. 
  6. Bake at 400 degrees F for 15 minutes.
 I did sprinkle sugar on top prior to baking them.


I hope you enjoy them and happy eating!!!


Jenni


Saturday, October 15, 2011

Strawberry Muffins

Here is the strawberry muffin recipe I used today!!  I've already had a couple and they're super yummy!


This recipe is from www.cooks.com.
 

Read more about it at www.cooks.com/rec/view/0,194,158168-244197,00.html
Content Copyright © 2011 Cooks.com - All rights reserved.
  • 1 - 1 1/2 c. berries washed, hulled, dried (can use frozen, thawed) 
  • 3 c. flour (gluten-free)
  • 1 tsp. Xanthan gum
  • 1/2 c. granulated sugar
  • 1 tbsp. baking powder
  • 1 tsp. salt
  • 1/2 c. brown sugar
  • 1/2 c. melted butter
  • 3 eggs 
  • 1 c. milk
Directions:
  1. Sift together flour, granulated sugar, baking powder, Xanthan gum, and salt.
  2. Add brown sugar and stir to blend.
  3. Combine butter, eggs, and milk and stir into dry ingredients until just blended.
  4. Fold in berries carefully.
  5. Pour into greased muffin tins.
  6. Bake at 400 degrees for 20 minutes. Makes 20-24.
As I was making the muffins, I used 1 cup of Arrowhead Mills White Rice Flour and 2 cups of the Gluten Free Pantry All-Purpose Flour.  Also, my advice with the strawberries is to use fresh ones and use more of them to make the muffins more fruit filled.


Also, you can make a strawberry butter to use with the muffins.  I didn't actually make it this time around; however, here's the recipe that was included:

Strawberry Butter

Ingredients:
  • 1 c. butter (room temperature) 
  • 3/4 c. frozen strawberries 
  • 2 tbsp. powdered sugar
Directions: Blend in blender.

Hope you enjoy!!! Happy eating!!

Jenni

    Other Gluten-free Flours I've used...

    Here are a couple of other gluten-free flours I have used:


    Both of these flours have seemed to work well individually; however, I will say that the white rice flour tends to be gritty.  If you want to "smooth" the texture out some from the white rice flour, then try mixing half of the white rice flour with half of an all-purpose gluten free flour or another gluten free flour.

    Happy cooking!

    Jenni

    Raspberry Muffins


    I had been planning on making these a while ago; however, the first set of raspberries I had gotten went bad before I could do them.  So...I decided to try once again.  And...they look so yummy!!

     Also, keep in mind that this recipe isn't originally mine.  I found it at www.cooks.com.

    Read more about it at www.cooks.com/rec/view/0,194,148163-247206,00.html
    Content Copyright © 2011 Cooks.com - All rights reserved.

    Topping Ingredients:
    • 2 tbsp. butter, softened 
    • 1/4 c. flour (gluten-free)
    • 1/4 c. brown sugar
    Muffin Ingredients:
    • 1 1/4 c. flour (gluten-free)
    • 2 tsp. baking powder
    • 1/2 c. sugar
    • 1/2 tsp. Xanthan gum
    • 1 egg, beaten
    • 1/2 c. milk
    • 1/2 c. butter, softened 
    • 1 c. fresh raspberries
    Directions:
    1. Mix the first 3 ingredients (butter, flour and brown sugar) together and set aside for the topping.
    2. Mix together by spoon the sugar, egg, milk and butter; stir in the flour, Xanthan gum, and baking powder. 
    3. Add raspberries. 
    4. Fill muffin pans 2/3 full and sprinkle topping mixture on top.  
    5. Bake at 375°F for 20 minutes.
    Before...
    After...

    After #2

    I will say that when I was baking that I used the Gluten Free Pantry version of all purpose flour for the 1/4 cup flour in the topping and 3/4 cup of flour in the actual muffin mix.  The other 1/2 cup of gluten free flour was actually white rice flour from Arrowhead Mills.  Also, rather than specifically measuring the raspberries, I actually just put the entire 6 oz. container in.  This recipe can make a dozen small muffins or 6 large muffins.

    Hope you enjoy them!!  Happy eating!!!

    Jenni

    Gluten Free Mac-N-Cheese

    So, a friend of mine just sent me this recipe she uses to make gluten free macaroni and cheese.  I haven't made it yet, but she says it tastes super yummy.  Thank you for sharing Megan!!!

    Gluten Free Mac-n-cheese

    Ingredients:
    • Use quinoa elbow noodles
    • 2 bags shredded cheese (any kind you want to use, she uses sharp)
    • Ragu cheese sauce (you can find it in the pasta aisle)
    • 1/4 cup melted butter
    • 1/2 cup milk
    • 1 tablespoon mustard
    Directions: 
    1. Boil box of noodles and put noodles in baking dish.  Don't let the noodles sit too long or they'll become sticky.  You can add a teaspoon or two of olive oil if you'd like to make sure they don't stick.
    2. Pour milk and butter over noodles, make sure they are covered.  Add more milk if need to make sure the noodles are covered.
    3. Stir in mustard.
    4. Stir in cheese sauce and 1 1/2 bag of cheese.
    5. Cover top with cheese.
    6. Salt/pepper to taste.
    7. Bake 45 minutes at 350.
    Hope you enjoy it!  Happy eating!!

    Jenni

    Tuesday, September 13, 2011

    Gluten-Free Pasta for Dinner

    On my grocery trip this past Saturday, I decided to peruse the Whole Foods store near us to see what gluten free items they had for us to try.  I compared several different products, and knowing that Andrew misses having pasta, I decided to try the Ancient Harvest Quinoa Shells.


    This evening I decided to make the pasta I had bought because, like every other day during the work week, I wanted to make something easy.  I don't have an official name for this and quite frankly it's pretty easy.

    Ingredients:
    • 2 boxes of the Ancient Harvest Quinoa shells
    • 1 jar of pasta sauce (whatever your favorite)
    • pepperoni (I used turkey pepperoni to make it a slightly more low fat)
    • 1 bag of shredded mozzarella cheese (give or take a little)
    Directions:
    1. Preheat the oven to 375 degrees F.
    2. Cook the pasta per the directions on the box.  You may want to cook the full time or a couple of extra minutes depending on your oven.
    3. Strain the pasta and pour into a 9 by 13 inch pan.
    4. Mix in 1/2 cup of shredded cheese (or so), 1/4 package of pepperoni and pasta sauce.
    5. Layer more pepperoni and cover with more cheese depending on your taste.
    6. Place in the oven until the cheese on top has melted and serve!

    Enjoy and happy eating!!!

    Jenni

    Zucchini Bread

    It's amazing how quickly time flies when you get caught up in other things (aka work)!!

    A few weeks ago a friend of ours gave us a big zucchini that I honestly had no idea what to use for or even how to cook with it.  I will say that I used part of it in the broccoli chicken casserole that I typically make, but replaced the broccoli with sauteed zucchini.  But...I ended up having extra zucchini left over that I had absolutely no idea of what to use it for or to cook it with.  So, I decided that Andrew needed something different for breakfast and made him a couple of loaves of gluten-free zucchini bread.

    For those of you who cook "normally" and don't have to worry about eating gluten-free, here's the website that I used: Mom's Zucchini Bread Recipe.

    For those of you who cook gluten-free, here's the amended recipe for you to enjoy!!!

    Ingredients:

    • 3 cups all-purpose gluten-free flour (Bob's Red Mill)

    • 2 tsp. Xanthan gum (Bob's Red Mill)
    • 1 teaspoon salt
    • 1 teaspoon baking soda
    • 1 teaspoon baking powder
    • 3 teaspoons ground cinnamon
    • 3 eggs
    • 1 cup vegetable oil
    • 2 1/4 cups white sugar
    • 3 teaspoons vanilla extract
    • 2 cups grated zucchini
    • 1 cup chopped walnuts

    Directions:

    1. Grease and flour two 8 x 4 inch pans. Preheat oven to 325 degrees F (165 degrees C).
    2. Sift flour, salt, baking powder, soda, and cinnamon together in a bowl.
    3. Beat eggs, oil, vanilla, and sugar together in a large bowl. Add sifted ingredients to the creamed mixture, and beat well. Stir in zucchini and nuts until well combined. Pour batter into prepared pans.
    4. Bake for 40 to 60 minutes, or until tester inserted in the center comes out clean. Cool in pan on rack for 20 minutes. Remove bread from pan, and completely cool.


    It really is relatively easy to do.  Just follow the directions!


    Happy eating!!!

    Jenni

    Tuesday, August 16, 2011

    Tonight's Dinner Is...

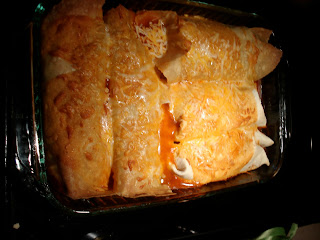
    Enchiladas!!!

    Sorry, I got a little excited about that.  Just so everyone knows...I am making them gluten-free friendly.  We tend to do tacos/burritos a lot here at the Carr residence.  We have been able to find a gluten-free wrap for Andrew to eat.  It's made by LaTortilla Factory.  They are the Smart & Delicious Wraps Gluten Free, Wheat Free.


    I'll be honest, when we're doing tacos, it doesn't necessarily taste the greatest; however, the last time I made enchiladas Andrew mentioned that the wraps tasted better because of the sauce that I used.

    Ingredients:

    • 1 lb. of ground beef (could be replaced with ground turkey or even cubed chicken)
    • 1 packet of taco seasoning (or if you don't have that: 2 tbs. Mexican chili powder, 2 tbs. paprika, and 1 tbs. of onion powder)
    • About 6 tortilla (large) shells (gluten-free for those who need or normal for those who don't)
    • 1 or 2 larger cans of Old El Paso enchilada sauce (can be the red or green, mild or medium)
    • Shredded cheese
    • 2 cups rice
    • 1 tsp. extra of the chili powder (for the rice)
    Directions:
    1. Preheat the oven to about 375 degrees F.
    2. Cook the rice according the packaging and add the extra tsp. of chili powder for seasoning.
    3. Brown the meat.  Once the meat is done, add the seasoning packet and 1 small (8 oz./1 cup) of water.  Mix the meat, water, and seasoning until the water is cooked off and the seasoning has coated/covered the meat.
    4. Take a 9 in. by 13 in. cooking pan and spray it with cooking spray so that the enchiladas don't stick.
    5. Take one of the tortilla shells/wraps and layer rice, meat, cheese, and 4 to 6 tbs. of the Old El Paso sauce inside.  Fold it as best you can and place inside the pan.  Continue until you've filled all of the tortilla shells.
    6. Pour the rest of the sauce over the enchiladas and put cheese on top.
    7. Place in the oven for about 30 minutes to crisp the edges and melt the cheese inside and on top.
    8. Once done, eat and enjoy with your favorite toppings!
    I will say that sometimes I have a difficult time folding the LaTortilla Wraps when they've been taken straight from the refrigerator.  Warming them slightly in the oven may help with the wrapping.

    The final product: 3 for Andrew, 2 for Me!


    Enjoy and happy eating!!!

    Jenni

    Sunday, August 14, 2011

    Breakfast Casserole

    This recipe was inspired by my step-mom, who often makes a similar recipe (if not the exact same thing) when my husband and I go home for the weekends or for holidays.  I probably should've asked for her recipe; however, the person that I am likes to make a challenge out of most things and try them on my own first (often times without a recipe), just to ask for help later.

    Also, I'll be honest, to many of you, the pictures I took of this recipe will look like a huge heart attack waiting to happen; however, believe it or not, you can make it A LOT healthier than what I did.  As is typical, you can add or take out whatever you want (except the eggs and the hashbrowns) that will satisfy your breakfast cravings.

    Breakfast Casserole


    Ingredients:

    • large bag of shredded hashbrowns
    • 2 dozen large eggs
    • 1 lb. of ground sausage (I used sausage links because that's what we already had.)
    • 1 package of bacon (take it or leave it)
    • 4 tbs. of milk
    • Salt and pepper to taste
    • 1 cup of cheddar cheese
    Directions:
    1. Spray or grease a 9 in. by 13 in. pan with cooking spray or shortening.
    2. Preheat the oven to 400 degrees F.
    3. Line the bottom of the pan with the shredded hashbrowns.
    4. Cook up the sausage and the bacon.  Crumble the sausage and bacon on top of the hashbrowns in the pan once fully cooked.  I would honestly advise using one or the other, but my husband is a meat-a-holic and wanted both.
    5. Crack the 2 dozen eggs into a bowl.  Add the 4 tbs. of milk to make a little fluffier along with a pinch of salt and pepper.  Pour the egg mixture over the hashbrowns and meat.
    6. Place in the oven for about an hour or until the egg looks fully cooked.
    7. Add the cup of cheese on top of the casserole and cook for 5 more minutes.
    8. Once it's done, let it cool a little bit and serve to your family.
    Casserole Before being cooked
    Casserole after being cooked

    Honestly, this pan will probably last him about a week and a half or so (Lord-willing).  Like I mentioned before, if you're not a big fan of all of the meat, feel free to add vegetables to it like peppers or onions, whatever you feel might be good in it.

    Hope you enjoy it!  Happy eating!!

    Jenni

    Saturday, August 13, 2011

    Sharing Pictures...

    I was in the process of making multiple items for Andrew's meals for the next week or so when I realized that a couple of the pictures on some of the previous postings weren't the greatest or weren't existent.  So...I'm going to share some of them now!

    For the recipe for the Cheddar Garlic Biscuits, check out the posting for August 7th!

    Gluten-Free Cheddar Garlic Biscuits

    For the recipe for the Strawberry Shortcake, check out the posting from July 23rd!

    Gluten-free shortcake

    Have a great day!!!

    Jenni

    Sunday, August 7, 2011

    Cheese Garlic Biscuits

    I honestly cannot take credit for these, but found them very easy to make and very yummy!!!  Thanks to Brenda Ferko, I was able to find these on the Gluten Freely website.  If you'd like to see the original recipe, just click on the link, Cheese Garlic Biscuits.  However, I'll go on ahead and post it here, as well.


    Ingredients:
    • 2 cups Bisquick® Gluten Free mix
    • 1/4 teaspoon garlic powder
    • 1/4 cup firm butter or margarine
    • 2/3 cup milk
    • 1/2 cup shredded Cheddar cheese (2 oz)
    • 3 eggs
    • 1/4 cup butter or margarine, melted
    • 1/4 teaspoon garlic powder


    Preparation Instructions: 

    1. Heat oven to 425°F. In medium bowl, combine Bisquick mix and 1/4 teaspoon garlic powder. 
    2. Cut in 1/4 cup butter, using pastry blender or fork, until mixture looks like coarse crumbs. Stir in milk, cheese and eggs until soft dough forms.
    3. Drop dough by 10 spoonfuls onto ungreased cookie sheet.
    4. Bake 8 to 10 minutes or until light golden brown. 
    5. Mix 1/4 cup melted butter and 1/4 teaspoon garlic powder; brush on warm biscuits before removing from cookie sheet. Serve warm.

    I personally did do a couple of changes or additions; however, they weren't too horribly drastic to take away from the recipe itself.  While I was melting the butter, I added about a 1/2 teaspoon garlic salt (instead of the 1/4 teaspoon garlic powder), and I added about a 1/2 teaspoon parsley to the melted butter.

    I did them in the 10 biscuits they recommended; however, next time, I may try them in smaller sizes so we have more to enjoy for later!  Hope you enjoy them as much as we did!!

    Happy eating!!

    Jenni

    Monday, August 1, 2011

    Apple Dumplings

    I've been more curious about baking gluten-free desserts probably more than I should; however, I figure trying out desserts (at least for me) is the best way to start gluten-free baking.  I was contemplating what kind of yummy desserts I could make using Bob's Red Mill Gluten-Free All Purpose Flour with the help of Bob's Red Mill Xanthan Gum.

    Anyways, one of the yummiest desserts I remember from growing up are apple dumplings.  The church I grew up in would do a couple of Saturdays creating apple dumplings to sell at the local county fair late in August.  I was also inspired by one of our friends, Laura, whose version of apple dumplings are slightly different than what I had grown up with.

    With those two ideas in mind, I decided to create my own version of apple dumplings (using some of their ideas, leaning more towards Laura's idea).

    Apple Dumplings

    Ingredients:
    Directions:
    1. Preheat the oven to 350 degrees Farenheit.
    2. Mix the gluten-free flour, xanthan gum, and salt together.
    3. Add the shortening, which may cause the dough to become crumbly.
    4. Add 1 to 1 1/4 cups of milk.  Mix together.
    5. Peel, core, and cut the apples into chunks.
    6. Mix the sugar and cinnamon together, and slice the 1/2 stick of butter into slices.
    7. Take part of the dough and roll it out to the desired thickness, preferably large enough to cover the bottom and the sides of an 8 in. by 8 in. baking pan.
    8. Place the dough into the bottom of a greased 8 by 8 in squared baking pan.
    9. Put about half of the apple chunks into the bottom of the dough.
    10. Sprinkle about half of the sugar/cinnamon mixture over the apples.
    11. Place several slices of the butter on top of the apples and sugar/cinnamon mixture.
    12. Take about half of the dough that's leftover and roll out with a rolling pin.  Place over the layer of apples.
    13. Use the last of the apples on the middle layer along with the sugar/cinnamon mixture as well as the butter slices.
    14. Take the last bit of the dough, roll out to cover the top.  Lightly sprinkle the sugar/cinnamon mixture on top of the last layer of dough.
    15. Place into the oven for about an hour until it is done!!
    Serve with ice cream!!!!

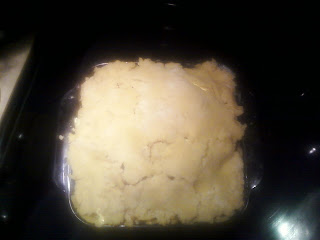
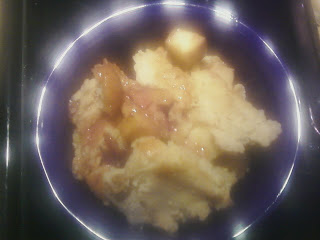
    I will say the pictures I am about to post don't necessarily do it justice, but it does taste very yummy.  I will be honest too that I sincerely do not own a rolling pin, so the dough didn't get nearly as thin as I wanted.  Also, I'd recommend using the extra 1/4 cup of milk so that the dough doesn't become as crumbly.

    Apple Dumplings Pre-baked

    Apple Dumplings Baked

    Apple Dumplings Before Yummy Eatng time!!!
    Like I said...the pictures don't do it justice! I hope you enjoy!!!

    Happy Eating!!!

    Jenni

    Thursday, July 28, 2011

    Bob's Red Mill Gluten-Free All Purpose Flour

    Today, I don't exactly have a recipe per se to share with you; however, I do have a product I'd like to share.  Andrew and I have been using Bob's Red Mill Gluten-Free All Purpose Flour a couple of times to replace the flour we had been using.   We've used the flour for shortcake for strawberry shortcake and crust for pizza.  You will want to use it in combination with the Xanthan Gum from Bob's Red Mill (or someplace else) as a replacement for the gluten in other flours.  Typically, you will want to do about 1 cup of flour to every 1 teaspoon of the Xanthan gum.

    You can find any Bob's Red Mill products at the following places (there may be more!):
    • Kroger (in the natural foods section)
    • Whole Foods (in the baking section)
    • Bob's Red Mill website
    • Amazon (type in Bob's Red Mill)
    Happy eating!!

    Jenni

        Monday, July 25, 2011

        Broccoli-Chicken Casserole

        So...I finally made the last broccoli-chicken casserole that I mixed up at the beginning of last week.  I will forewarn you that this recipe made three dishes full of the casserole: an 8 x 8 squared inch dish, a casserole dish, and an 11x 6 (or so) squared inch dish.  I'll also forewarn you that I did freeze (covering them of course before I did) all three of the dishes because I knew we weren't going to be eating them in sequence (i.e., three days in a row).  Also, there are a few adjustments that I would do to the amount of ingredients (which I'll mention at the end); however, the basic directions are still the same.  With that said...here we go!!!

        Ingredients:
        • 6 cups uncooked rice
        • 1 small white/red onion (up to you)
        • 9 tbs. of butter/margarine (divided)
        • 1 cup of milk
        • 2 lbs. of Velveeta cheese
        • 2 cans of chicken
        • 1 bag of frozen broccoli
        Directions:
        1. Begin cooking the rice according to it's packaging.
        2. Open the bag of frozen broccoli into a large mixing bowl.
        3. Chop up the onion into small pieces and sautee in 1 tbs. of butter/margarine.  You may leave this out if you'd prefer, but I think it gives it more flavor.  Once sauteed, place in the large mixing bowl with the broccoli.
        4. Open the cans of chicken and drain.  Then, place into the mixing bowl with the broccoli and onions.
        5. Cut the other 8 oz. of butter (if using a stick) into thin slices to make it easier to mix later and place in the mixing bowl with the other 3 ingredients so far.
        6. Cut the Velveeta cheese into smallish chunks and place into the mixing bowl as well.
        7. Once the rice is done (per the packaged directions), add the rice into the mixing bowl along with the ingredients in so far.
        8. Add the 1 cup of milk.
        9. Mix all of the ingredients together.
        10. You'll want to grease each dish to discourage sticking.  You may use Pam spray or shortening.
        11. If you're doing two meals with this, I recommend using 2- 9 by 13 inch dishes.  If you're doing more than two meals, I would divide it up among at least three different dishes.
        12. Divide the casserole mixture into the different dishes being used.
        13. If you decide to cook one of them, I would recommend cooking at 375 degrees for about 30-60 minutes depending on how it looks after the 30 minutes.
        14. Halfway through cooking (15-30 minutes), I do stir the casserole so that the cheese is more evenly spread throughout.
        15. Once done, pull out of the oven and enjoy!!!
        If you choose to freeze them and then use them for your evening meals (dinner/super-whichever is your term of choice), I recommend pulling them out in the morning and placing them in the refrigerator to thaw for most of the day.  This helps so that there's less cooking time and the dish is less likely to break with the heat change.  Also, I would definitely cook the casserole if thawed from the freezer for the 60 minutes at 375 degrees, stirring about the 30 minute mark.


        Before being cooked

        After being cooked


        Changes that I recommend to the recipe that you may try are:
        1. Adding an extra bag of broccoli: This will add more broccoli to each of the dishes you put the casserole into. 
        2. Adding an extra 1/2 cup of milk: This may add more moisture to the dish if that's what you feel like doing.
        3. Adding an extra cup of Velveeta cheese: I noticed that one of our pans didn't get much of the cheese.  If you did one more cup, it may even out the amount a bit.  Honestly though, I think it turned out fine (for the most part), especially since I mixed halfway through cooking.
        4. Take out the chicken altogether: If you're just looking for something as a side-dish, feel free to take the chicken out altogether.  I added the chicken, frankly, because I was lazy and didn't feel like doing more than one thing for a meal.  It made it easier to add and mix it all as one main dish.
        5. Subsitution: If you want, you could substitute the milk with cream of mushroom soup; however, the dish would NOT be gluten free then.  Most cream of mushroom soups have a wheat/gluten biproduct in it.  If you do the cream of mushroom soup, I would do at least one can, and then, keep the full cup of milk.
        Hope you all enjoy this dish!

        Jenni


        Sunday, July 24, 2011

        Chicken Alfredo

        A few weeks ago, Andrew was mentioning to me how much he missed eating pasta, specifically at Olive Garden, and was craving the pasta.  So, I decided to take it upon myself and search of pasta that might work.  I hadn't done a whole lot of shopping regarding gluten-free foods, so shopping for gluten-free foods is still pretty new to me.  I ironically had a gift card to Trader Joe's that I was given and hadn't used yet.  I remembered that I REALLY like their strawberry flavored licorice bites and decided to go in and get a container of those.  While I was at it, I figured I'd look for gluten-free pasta.  Guess what?!  I found some!!  It was their organic brown rice penne pasta.  I went home and told Andrew about my find and when I went grocery shopping later in the week I picked up some alfredo sauce to use with it.

        So, about this time last Sunday, I was working on making different meals for us for the entire week that was gluten-free.  One of those was Chicken Alfredo with gluten-free pasta I picked up at Trader Joe's for $1.99.  Instead of cooking it as a complete meal right then, I separated it out into some smaller containers for Andrew to take to work with him and reheat.

        Ingredients:
        Directions:
        1. Cook the past as per the directions on the bag.  The pasta will most likely come in a green bag.
        2. I mixed the 2 small jars of alfredo sauce in a bowl with the chicken to help break up the larger chicken chunks.  If you're looking to prepare the meal for eating right then, then you will want to heating the sauce and the chicken up on low heat until the pasta is done cooking; however, since I was dividing them up for smaller meals for Andrew later I didn't.
        3. Once the pasta is done cooking to your liking, strain it in the strainer.
        4. I tend to dump the pasta back into the pot that I cooked it in.  I mix in the chicken and the alfredo sauce (heated or unheated depending on the purpose of the meal) with the pasta.
        It's really, honestly super easy to prepare and doesn't take much thinking to do.  If you do decide to use all of the pasta that you've prepared for a meal later (rather than divide it up into smaller portions), I would recommend putting it in a greased cooking/baking dish so you can pop it in the oven until it's heated all the way through.  Also, the reasoning behind using two jars instead of just one jar of alfredo sauce is because when using alfredo sauce of any kind the pasta tends to absorb the sauce while sitting in the refrigerator if there are leftovers.  When we reheat it for later meals, I never feel like there's enough sauce left in the container.

        Trader Joe's does have a list of products that are gluten free if you are interested in checking them out.  If you have any questions regarding any of the products, the people who work at Trader Joe's are more than happy to help answer your questions and make recommendations.

        Sorry there aren't any pictures this time around.  Maybe when I fix it again!

        Enjoy!  And, happy eating!!

        Jenni

        Saturday, July 23, 2011

        Strawberry Shortcake

        This evening I happened to fix one of the casseroles (I'll post that recipe later) I prepared earlier in the week as dinner.  As the casserole was baking, I was thinking, "I really need to try a dessert with the gluten-free flour that we have to see how it turns out."  Well...I decided to do just that.  I had peered into the refrigerator and remembered that we had strawberries and I didn't want them to go bad before I was able to use them.  So...strawberry shortcake it was!!!

        I typically use a recipe from a cookbook that I was given at Christmas within the last 5 years or so.  It's actually really yummy (gluten-free or not)!  It comes from the cookbook, Taste of Home Mom's Best Meals and was entered by Karen Wingate of Kansas.  The recipe is called (not by me, but by the original creator) "Mom's Strawberry Shortcake."

        The recipe calls for:
        • 2 eggs
        • 1 1/2 cups sugar (divided)
        • 1 cup gluten-free all-purpose flour (my slight amendment)
        • 1 teaspoon baking powder
        • 1/4 teaspoon salt
        • 1 teaspoon xanthan gum (my amendment)
        • 1/2 cup milk
        • 1 tablespoon butter
        • 1 teaspoon vanilla extract
        • 1 to 1 1/2 quarts fresh strawberries, sliced
        • Whipped cream
        • Mint leaves, optional
        Since I used Bob's Red Mill Gluten-free All-Purpose Flour, I added a teaspoon of Xanthan Gum (also from Bob's Red Mill) to help replace the gluten from the regular all purpose flour.  Both of those can be found in Kroger.  If you have someone in your family who happens to be diabetic, you can also replace the sugar with Splenda or any other sugar alternative you're willing to try cooking with.

        The rest of the directions include (with some of my side-notes):
        1. In a mixing bowl, beat eggs on medium speed for 3 minutes.  Gradually add 1 cup sugar, beating until thick and lemon-colored.
        2. Combine flour, baking powder and salt; beat into the egg mixture.
        3. Heat milk and butter just until butter begins to melt.  
        4. Beat into batter with vanilla (batter will be thin).
          • Trust me...it'll be thin!  It was thin pre-gluten-free and now gluten-free.
        5. Pour into a greased 8-in. square baking pan.
          • This is actually the best type of pan to use in order for it to cook evenly and completely.
        6. Bake at 350 degrees for 25 minutes or until a toothpick inserted near the center comes out clean.
        7. Cool for at least 10 minutes; then, cut into squares (about 9 servings).
        8. Dish up the shortcake, strawberries, and whipped cream with the garnish of mint leaves (if you choose).
        The recipe continues on with other steps between 7 and 8, but I don't normally do the last portions (so I won't give them to you).  Usually while the shortcake is baking, I cut up the strawberries into small pieces and use the remaining sugar to mix in with the strawberries.  I put them back into the refrigerator until we're ready to eat them.

        Shortcake

        Yes, I realize that I didn't do a couple of things from the recipe that I just gave. First of all, I didn't use an 8-in. squared pan because the only one I have was being used for the casserole (recipe later to be posted).  Secondly, you're probably wondering why the center caved in a little.  Well, I actually had ended up letting the shortcake in the oven for 27 minutes rather than the 25 to compensate for the difference in dishes.  Honestly...I probably should've let it go for about 3 minutes longer (making the total 30 minutes for this dish size).  I will say that although the middle flopped a little, the rest of it was completely cooked and it was quite yummy. When I use the 8-in. squared pan, the shortcake does turn out fully cooked within the 25 minutes called for in the recipe.

        I will try to have more pictures for the next time I fix it!!  You should try it out!  Enjoy!!

        Jenni

        Beginnings of the Confusion...

        So...in attempting cook this week in an 85 degree house, I was contemplating of creating a blog of my experiences in cooking gluten-free meals for my husband.  Now you're probably thinking to yourself, "Why would any sane person cook if their house is 85 degrees?"  Well...first of all, I knew we needed to eat cheaply, and secondly, I needed to keep my mind off of the heat by...somehow adding to the heat.  Yes, I realize that makes absolutely no sense, but that's all right.

        Now, you're probably wondering why I'm trying to do gluten-free meals for my husband.  Well, ironically enough, a few months ago, he started complaining of his stomach hurting.  It went from a dull, constant ache (from what I remember) to almost stabbing pains.  He went to the doctor who suggested he take medications the relieve some of the pain; however, those were just a temporary fix.  Meanwhile, close friends of ours had a son who was having some health issues and some of their family recommended that they try going dairy-free and gluten-free for a while to see if their son would feel better.  They tried it out and he did.  Well...it made me think...maybe we should try to get rid of some (actually all of it as much as possible) of the gluten in our diet (or at least my husband's diet).  We tried it for a few days and it worked.

        Now...I will say that he's not 100% gluten-free all of the time, but I try to help out as much as possible.  At the beginning, I was so confused as to where to look or what to consider making or even how to go about making gluten-free meals.  Over time, I've adapted some of my recipes that I've used in the past, as well as tried new recipes.

        I will try to include some of my findings in case anyone else is stuck without knowing where to go or what to do.  Honestly, I still have a lot to learn, but if I can help someone else out...I'm more than happy too!!

        Happy cooking!!

        Jenni