Pages

Tuesday, August 16, 2011

Tonight's Dinner Is...

Enchiladas!!!

Sorry, I got a little excited about that.  Just so everyone knows...I am making them gluten-free friendly.  We tend to do tacos/burritos a lot here at the Carr residence.  We have been able to find a gluten-free wrap for Andrew to eat.  It's made by LaTortilla Factory.  They are the Smart & Delicious Wraps Gluten Free, Wheat Free.


I'll be honest, when we're doing tacos, it doesn't necessarily taste the greatest; however, the last time I made enchiladas Andrew mentioned that the wraps tasted better because of the sauce that I used.

Ingredients:

  • 1 lb. of ground beef (could be replaced with ground turkey or even cubed chicken)
  • 1 packet of taco seasoning (or if you don't have that: 2 tbs. Mexican chili powder, 2 tbs. paprika, and 1 tbs. of onion powder)
  • About 6 tortilla (large) shells (gluten-free for those who need or normal for those who don't)
  • 1 or 2 larger cans of Old El Paso enchilada sauce (can be the red or green, mild or medium)
  • Shredded cheese
  • 2 cups rice
  • 1 tsp. extra of the chili powder (for the rice)
Directions:
  1. Preheat the oven to about 375 degrees F.
  2. Cook the rice according the packaging and add the extra tsp. of chili powder for seasoning.
  3. Brown the meat.  Once the meat is done, add the seasoning packet and 1 small (8 oz./1 cup) of water.  Mix the meat, water, and seasoning until the water is cooked off and the seasoning has coated/covered the meat.
  4. Take a 9 in. by 13 in. cooking pan and spray it with cooking spray so that the enchiladas don't stick.
  5. Take one of the tortilla shells/wraps and layer rice, meat, cheese, and 4 to 6 tbs. of the Old El Paso sauce inside.  Fold it as best you can and place inside the pan.  Continue until you've filled all of the tortilla shells.
  6. Pour the rest of the sauce over the enchiladas and put cheese on top.
  7. Place in the oven for about 30 minutes to crisp the edges and melt the cheese inside and on top.
  8. Once done, eat and enjoy with your favorite toppings!
I will say that sometimes I have a difficult time folding the LaTortilla Wraps when they've been taken straight from the refrigerator.  Warming them slightly in the oven may help with the wrapping.

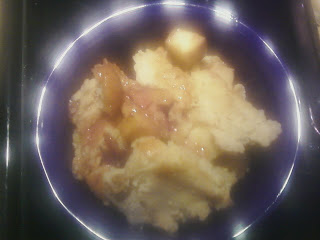
The final product: 3 for Andrew, 2 for Me!


Enjoy and happy eating!!!

Jenni

Sunday, August 14, 2011

Breakfast Casserole

This recipe was inspired by my step-mom, who often makes a similar recipe (if not the exact same thing) when my husband and I go home for the weekends or for holidays.  I probably should've asked for her recipe; however, the person that I am likes to make a challenge out of most things and try them on my own first (often times without a recipe), just to ask for help later.

Also, I'll be honest, to many of you, the pictures I took of this recipe will look like a huge heart attack waiting to happen; however, believe it or not, you can make it A LOT healthier than what I did.  As is typical, you can add or take out whatever you want (except the eggs and the hashbrowns) that will satisfy your breakfast cravings.

Breakfast Casserole


Ingredients:

  • large bag of shredded hashbrowns
  • 2 dozen large eggs
  • 1 lb. of ground sausage (I used sausage links because that's what we already had.)
  • 1 package of bacon (take it or leave it)
  • 4 tbs. of milk
  • Salt and pepper to taste
  • 1 cup of cheddar cheese
Directions:
  1. Spray or grease a 9 in. by 13 in. pan with cooking spray or shortening.
  2. Preheat the oven to 400 degrees F.
  3. Line the bottom of the pan with the shredded hashbrowns.
  4. Cook up the sausage and the bacon.  Crumble the sausage and bacon on top of the hashbrowns in the pan once fully cooked.  I would honestly advise using one or the other, but my husband is a meat-a-holic and wanted both.
  5. Crack the 2 dozen eggs into a bowl.  Add the 4 tbs. of milk to make a little fluffier along with a pinch of salt and pepper.  Pour the egg mixture over the hashbrowns and meat.
  6. Place in the oven for about an hour or until the egg looks fully cooked.
  7. Add the cup of cheese on top of the casserole and cook for 5 more minutes.
  8. Once it's done, let it cool a little bit and serve to your family.
Casserole Before being cooked
Casserole after being cooked

Honestly, this pan will probably last him about a week and a half or so (Lord-willing).  Like I mentioned before, if you're not a big fan of all of the meat, feel free to add vegetables to it like peppers or onions, whatever you feel might be good in it.

Hope you enjoy it!  Happy eating!!

Jenni

Saturday, August 13, 2011

Sharing Pictures...

I was in the process of making multiple items for Andrew's meals for the next week or so when I realized that a couple of the pictures on some of the previous postings weren't the greatest or weren't existent.  So...I'm going to share some of them now!

For the recipe for the Cheddar Garlic Biscuits, check out the posting for August 7th!

Gluten-Free Cheddar Garlic Biscuits

For the recipe for the Strawberry Shortcake, check out the posting from July 23rd!

Gluten-free shortcake

Have a great day!!!

Jenni

Sunday, August 7, 2011

Cheese Garlic Biscuits

I honestly cannot take credit for these, but found them very easy to make and very yummy!!!  Thanks to Brenda Ferko, I was able to find these on the Gluten Freely website.  If you'd like to see the original recipe, just click on the link, Cheese Garlic Biscuits.  However, I'll go on ahead and post it here, as well.


Ingredients:
  • 2 cups Bisquick® Gluten Free mix
  • 1/4 teaspoon garlic powder
  • 1/4 cup firm butter or margarine
  • 2/3 cup milk
  • 1/2 cup shredded Cheddar cheese (2 oz)
  • 3 eggs
  • 1/4 cup butter or margarine, melted
  • 1/4 teaspoon garlic powder


Preparation Instructions: 

  1. Heat oven to 425°F. In medium bowl, combine Bisquick mix and 1/4 teaspoon garlic powder. 
  2. Cut in 1/4 cup butter, using pastry blender or fork, until mixture looks like coarse crumbs. Stir in milk, cheese and eggs until soft dough forms.
  3. Drop dough by 10 spoonfuls onto ungreased cookie sheet.
  4. Bake 8 to 10 minutes or until light golden brown. 
  5. Mix 1/4 cup melted butter and 1/4 teaspoon garlic powder; brush on warm biscuits before removing from cookie sheet. Serve warm.

I personally did do a couple of changes or additions; however, they weren't too horribly drastic to take away from the recipe itself.  While I was melting the butter, I added about a 1/2 teaspoon garlic salt (instead of the 1/4 teaspoon garlic powder), and I added about a 1/2 teaspoon parsley to the melted butter.

I did them in the 10 biscuits they recommended; however, next time, I may try them in smaller sizes so we have more to enjoy for later!  Hope you enjoy them as much as we did!!

Happy eating!!

Jenni

Monday, August 1, 2011

Apple Dumplings

I've been more curious about baking gluten-free desserts probably more than I should; however, I figure trying out desserts (at least for me) is the best way to start gluten-free baking.  I was contemplating what kind of yummy desserts I could make using Bob's Red Mill Gluten-Free All Purpose Flour with the help of Bob's Red Mill Xanthan Gum.

Anyways, one of the yummiest desserts I remember from growing up are apple dumplings.  The church I grew up in would do a couple of Saturdays creating apple dumplings to sell at the local county fair late in August.  I was also inspired by one of our friends, Laura, whose version of apple dumplings are slightly different than what I had grown up with.

With those two ideas in mind, I decided to create my own version of apple dumplings (using some of their ideas, leaning more towards Laura's idea).

Apple Dumplings

Ingredients:
Directions:
  1. Preheat the oven to 350 degrees Farenheit.
  2. Mix the gluten-free flour, xanthan gum, and salt together.
  3. Add the shortening, which may cause the dough to become crumbly.
  4. Add 1 to 1 1/4 cups of milk.  Mix together.
  5. Peel, core, and cut the apples into chunks.
  6. Mix the sugar and cinnamon together, and slice the 1/2 stick of butter into slices.
  7. Take part of the dough and roll it out to the desired thickness, preferably large enough to cover the bottom and the sides of an 8 in. by 8 in. baking pan.
  8. Place the dough into the bottom of a greased 8 by 8 in squared baking pan.
  9. Put about half of the apple chunks into the bottom of the dough.
  10. Sprinkle about half of the sugar/cinnamon mixture over the apples.
  11. Place several slices of the butter on top of the apples and sugar/cinnamon mixture.
  12. Take about half of the dough that's leftover and roll out with a rolling pin.  Place over the layer of apples.
  13. Use the last of the apples on the middle layer along with the sugar/cinnamon mixture as well as the butter slices.
  14. Take the last bit of the dough, roll out to cover the top.  Lightly sprinkle the sugar/cinnamon mixture on top of the last layer of dough.
  15. Place into the oven for about an hour until it is done!!
Serve with ice cream!!!!

I will say the pictures I am about to post don't necessarily do it justice, but it does taste very yummy.  I will be honest too that I sincerely do not own a rolling pin, so the dough didn't get nearly as thin as I wanted.  Also, I'd recommend using the extra 1/4 cup of milk so that the dough doesn't become as crumbly.

Apple Dumplings Pre-baked

Apple Dumplings Baked

Apple Dumplings Before Yummy Eatng time!!!
Like I said...the pictures don't do it justice! I hope you enjoy!!!

Happy Eating!!!

Jenni